
How to Set Up a Moving Target System Without Digging Post Holes
On most ranges you can skip digging completely. If your ground takes a screw-in earth anchor, a pressure treated 4x4 held by four ratchet strap guy wires will carry the cable, and nothing permanent goes in the ground. Soil is what decides it.
To find out where that breaks down, we shipped ourselves one of our own kits. It arrived packaged exactly the way it lands on a customer's doorstep, and we set it up start to finish on a range we already knew had incredibly hard ground. Some of the anchors never seated. What follows is the whole process, including what we did instead.

We call this being our own customer. We take something we are about to sell, unbox it on the range, and use it as if we were you. This run flagged a few screw bits that need to be added to the kit.
One caveat before the parts list. The kit in this build is a special order version, not the standard Pro kit on our website. If you want what is shown here, email us before you order.
What comes in the portable end post kit
Eight 14 ft ratchet straps. They work as guy wires off the end post caps, and they can also pull the cable tight. Fourteen feet is the bare minimum we recommend, and longer is easier to work with.
Extra 1/8 in steel cable. Do not change the cable size. The pulley geometry is cut for 1/8 in and anything else will jam. If you need more, order it from us or take a piece to the hardware store and match it exactly.
Two end post caps. 8 mm laser cut bent aluminum. They sit on top of a 4x4 and your guy wire straps clip to them. Four screws through the top is overkill, two holds fine.
A hand winch. It mounts to one post and tensions the line.
A tool kit. Timber bolts for the winch, an 8 mm socket for the cable clips, D rings, eyebolts, long wood screws, and a driver bit to match.
Screw-in earth anchors. These are the real money of the kit. We use the 32 in anchors for most situations and there are shorter 18 in ones as well. Each anchor gets a topper that screws on once it is in the ground, and that topper is what your guy wire clips to.
The 4x4s are not in the box. We buy pressure treated 12 ft lengths at the hardware store the morning of a build and cut them down.

How do you know if your ground will take an earth anchor?
Walk the range before your team shows up. Setup time depends far more on the site than on the hardware. Soft clay soil on flat ground goes quickly, and a rock quarry with no hand tools in the truck will take you significantly longer.
Four things we look at on a range we have not worked before:
Trees along the left and right edges. Worst case, you have something solid to attach to. An eyebolt and a carabiner into a trunk is a legitimate end point.
The berms. A berm can be an attachment point on its own. Screw an earth anchor straight into the dirt and clip the cable to it.
Existing target stanchions. They often do not look sturdy, but we have had success screwing directly to stanchions already on the range.
What is under the topsoil. This is the one that decides whether you are digging. Put a test anchor in the ground before you commit to a layout.
We keep the truck stocked so that no site can stop us: 6 ft fence posts, a stack of 3 ft fence posts, 12 ft pressure treated 4x4s, 8 ft pressure treated 2x4s, a gas post hole driver, a gas earth auger, a larger impact for the anchors, hand tools and protective equipment, drill bits, and marking paint.
How do you build the end post?
Do all of it on the ground. Every one of these jobs needs a ladder once the post is standing.
Cut the 4x4 to length. We cut a 12 footer down to 10 ft for this build.
Mount the hand winch about 5 ft up. Orientation matters, and the two crossbars go on the bottom. Two timber bolts and an impact hold it. The handle will not thread all the way on hand tight, so have a wrench with you.
Pre-drill the top eyebolt hole, then screw the eyebolt home. Skip the pre-drill and you will put a huge crack in the 4x4.
Set the end post cap on the diagonal, so the two guy wires come off to the sides rather than square to the post. There is no real science to it.
Add the D ring or carabiner and the pulley at the top.
Run the line down through the pulley to the winch while everything is still lying in the grass.
One eyebolt needs to be adjustable up and down. If one end of your run sits on higher ground than the other, that adjustment is how you get the cable level.
All of this hardware stays on the post afterward, so it is a one time job. The far post is the same build without the winch, and the cable connects straight to its top eyebolt.
We ran Kevlar rope rather than steel cable on this setup because it is easier to handle for a one day build. Steel is the better long term choice, and it shows later: the carriage slips more on the slicker line.

How do you set the anchors and stand the post?
Mark the layout
Mark your center point, where the post will sit.
Mark four guy wire points 12 ft out from center on the diagonals. We run a tape to 24 ft, mark both ends and the middle, then pivot the whole thing and do it again.
The two anchors on the range-center side can come in closer, because the cable itself pulls the post inward. We mark those at 10 ft.
Drive the anchors
Pull the safety cap and drive the anchor with an impact gun. A 1/2 in or 3/4 in impact drives them better, but the fitting works on a normal household impact.
Do not stand them straight up or cant them backward. It is tempting and it gives more pullout force, but it bends the shaft and you will not get a second use out of them. Lean each anchor the way its guy wire is going to pull.
Screw the toppers on right away. Once the threads gum up it is basically impossible.

Stand the post
Clip four straps to the cap. This is the point where you want a second person. Working alone, stand the post and cross-brace it with 2x2 strapping first.
Set the post on the mark with the winch pointing at the center of the range. Get this backward and you will need a ladder to run the line.
Keep tension on one side while you work around the others crisscross. It does not need to be right on the first pass.
Level it. Knocking the base sideways works while things are still loose. Once it is tight, tighten one side while loosening the opposite side at the same time.
It does not have to be perfectly plumb. What matters is that the cable is the same height at both ends, and that the post has no wobble in it.
The biggest guy in your department should be able to put his whole weight into that post and it should not budge.
What if the ground is too hard for earth anchors?
You adapt, and you can usually still avoid a permanent installation.
The range in this build has a thin layer of topsoil over 3/4 minus drainage and flat rock, then fill. Whoever designed it did a serious job on the drainage, which is great for the range and terrible for earth anchors. Ours hit stone and stopped.
So we went hybrid:
One end is a tree. An eyebolt into the trunk, a carabiner on the eyebolt, and the cable clipped to that.
The other end is a 4x4 standing on top of the ground, fastened to a single 6 ft fence post driven in. That one post carries enough of the load to hold the 4x4 up until the cable comes tight.
The back guy wires run to 3 ft fence post pickets instead of earth anchors.

Two details worth copying. The pickets did not have holes big enough to clip to, so we drilled our own as low as we could get them. A high hole gives the picket a moment arm and helps it lever itself out of the ground. And if you are assembling this yourself from hardware store parts, put a second eyebolt in the back of the post instead of using a cap, because the cap is not required for that job.
Our 4x4 ended up tilted back and visibly crooked. We left it alone, because we knew what would happen once the cable pulled against it, and it straightened out.
Leveling a hybrid run is harder, since the two ends are different things at different heights. If you cannot eyeball it, run a carpenter string between the ends with a line level on it and pre-level that way.
How long and how high should the cable be?
Span is limited by sag and by how tight you can get the line, not by a fixed number.
90 to 100 ft is the sweet spot for most setups.
Short spans work too. The hybrid run in this build is about 75 ft.
Cable height is dealer's choice, between 8 and 12 ft. Most people land on 10 ft. Go higher if your group is less experienced or you want long target lumber hanging well below the electronics. Go lower if you are not worried about the carriage getting shot.
Put eye protection on before you tension the line. A cable under load can let go no matter how good your rigging is, so stand yourself out of the line of the snap and put your helpers and spectators where one failure cannot catch all of them.
How do you hang the target?
The carriage hangs from target lumber, a 2x4 on the Pro or a 2x2 on the Plus. There is a minimum weight to make it hang straight, roughly 3 lb on the Pro and 2.6 lb on the Plus. Under that, the lumber sits out at an angle instead of hanging plumb and the system will not work properly. Maximum is 20 lb under ideal conditions, and we would not run near the top of that without a reason. Start light and work up. The bracket has three screw holes and two of them will do.
Getting the carriage onto the cable trips people up more than anything else on this list. The top bolt is designed to come off so that you never have to drop the cable. Loosen the line, pull the top bolt and the spacer out, slip the cable through, and put the bolt back in. It is easier closer to the center of the span. Put that bolt back: the system runs without it, but if the carriage ever jumps the line it comes down on the ground.
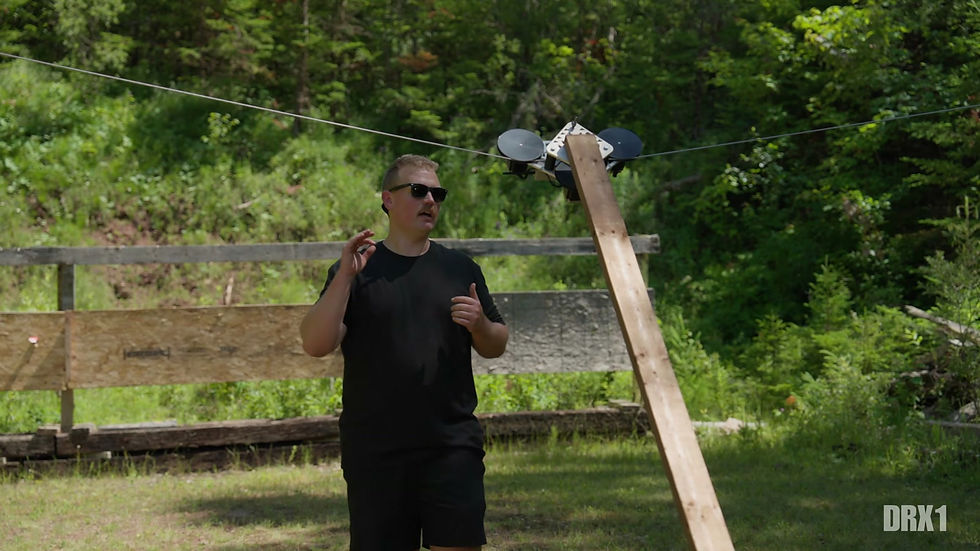
Before you cut lumber to final length, walk back to your firing point and look down the line of fire. If the target hangs too high and your shooters are close in with pistol, you can lob rounds over the berm. Set the height so that the line of fire from where people will actually stand goes into the berm.
Cardboard goes on with the wood screws from the kit. Put a rubber backer behind it for rigidity, and offset the A zone so rounds do not chew through the same spot all day.
Rubber hangs the same way, with the same screws.
Steel hangs from rubber straps. Do not screw steel directly to the lumber.
Wind is its own problem. On an exposed range, drop to a 2x2 to save weight, run the lumber long, and add a cable along the bottom to stop the target blowing up and back. The carriage rides lower at the center of the span and higher at the ends, so that bottom attachment has to be a slit channel that lets it travel. A cable in front and a second one behind does the same job.
What can the X1 remote do?
Wherever you power the remote and the carriage on is your zero. From there:
Set distances. Press a number and the carriage runs there and stops on its own.
Moving target mode. Press M, choose a maximum distance, and it sweeps back and forth on its own.
Random mode. Press R, choose a maximum distance, and it moves to random points between zero and that limit.
Program mode. Hold P, drive the carriage to each position and save as you go, then press P to store the recording. Tap P to play the exact scenario back. This is the one we see instructors use most, usually with barricades and no-shoot targets staged in front.
Speed and acceleration are separate buttons. Top speed is 10 ft per second. Backing off the acceleration helps a lot when the carriage is slipping on the line.
Emergency stop. The red button locks the motors for a few seconds to stop the carriage instantly, then puts them to sleep.

Two features save somebody a walk down range. The carriage can lose its position, most often on the slicker carbon fiber cable or after a hard emergency stop. Hold the zero button and it resets zero wherever the carriage is sitting, so nobody has to go out and push it back by hand. And the flashing LED on the carriage means it is running normally. If it stops flashing while no inputs are going in, something is wrong.
Leave the power on through the day. With motor hold off the motors spin freely and cost you almost no battery, and it is motor hold and actual movement that drain it. The remote's battery is behind four screws in its base and is a standard 9V; it lasts a long time but gives no warning, so keep spares in your range box.
For long distances, the directional antenna screws into the same hole as the standard one. Point it at the target.
Watch the full video
The whole build is below, from cutting the box open to steel hanging on the line, including the parts where the ground did not cooperate.
We are Dynamic Range X1, the moving target company. We have helped over 2,000 military units, police departments, and ranges upgrade their training by adding movement. If you want help choosing a system for your range, or you have a custom range build underway, email info@dynamicrangex1.com.





Comments